Post may contain affiliate links. Click to read Disclosure . Click to read Privacy Policy.
Here’s the progress we’ve made so far in this series on How To Start Your Own Blog
- decided to start a blog
- found our niche
- bought a domain
- chose the blogging platform
- set up your blog and made it all pretty 🙂
- signed up for and installed Google Analytics
- added copyright to the website footer
- added a Privacy Policy and Disclosure page
- added an About Page
- set up our email newsletter
Choosing And Installing Plugins For Your New Blog
There are many things that make the day to day work of blogging easier. As time goes on and you begin to have a lot of content on your site and a larger audience, things get busier and can become overwhelming, so you want to make sure you grow at a steady pace and have the tools in place to help you manage it al as you grow,
One thing you can do right in the beginning is add some plugins that will make things easier for you. Now, bloggers have a love/hate relationship with plugins. I have often jokingly been called the Queen Of Plugins by my fellow bloggers.
A plugin is something you can add to your blog to help or add features to your blog, think of it as a WordPress add on. It’s kinda of like the old “…there’s an app for that…” commercial. Anything you can think of (pretty much) is available through a plugin. Some are free and some are not. The ones that are not free are called WordPress premium plugins. (Side note: many people refer to WordPress as WP – so, if you see wp plugins, it’s the same as we are discussing in this post).
As you grow, be sure you weigh that cost, do you need to pay for it? Is there a free one? Is there one that starts out free and as you grow you can pay to get the next level from it? Is it really something you need right now, can it wait?
The love relationship we have with plugins, as bloggers, is that they can help make things easier for us, more fun, prettier, and so on. The hate part is that they can be costly, they can “break down” without warning causing major issues on your site and the only way you can find out which one is the culprit is to deactivate them all and reactivate them one at a time to see which one, if any, are causing the issue. They can and usually also do slow your site down – there’s debate on that but, the general consensus is the more you have the slower the site.
When you search through plugins to find one that will fill your specific need at the time, make sure you pay attention to the rating by other users of the plugin, and also take note of the last time it was updated. If it’s been a year or more then it might be that the creator has abandoned it and that means eventually it will cause you problems or stop working altogether. WordPress makes updates all the time and if the plugins aren’t updated they often cause issues on our site or cause security risks because protections are being kept up with, so, knowing that a plugin is being well cared for by the creator is important.
Let’s get down to the how to part, shall we?
In your dashboard on the left you’ll see Plugins:
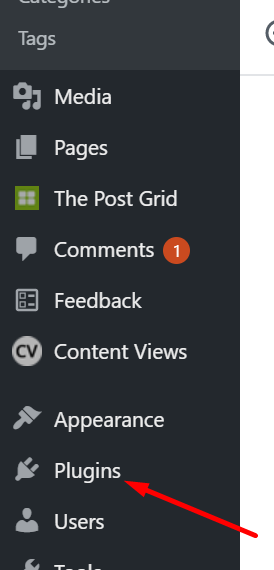
Let’s say you saw a number out to the right of the word Plugins, like you can see in this screenshot beside Comments, let’s discuss what that means.
That 7 means I have 7 plugins that have updates I need to approve and allow. To do that, you need to hover over the word Plugins and you’ll see this:
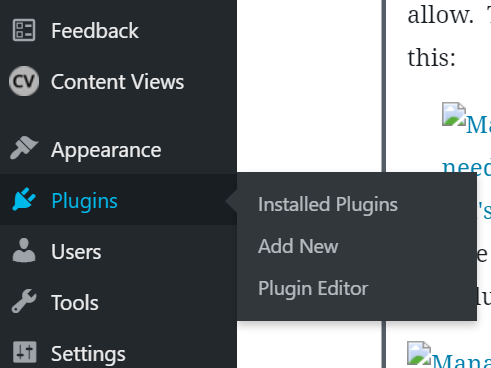
Choose Installed Plugins and you’ll be taken to your plugins page, full of free plugins.
You’ll be able to scroll through your list of plugins and see which ones have an update available. At this point you can choose to view the new version details, or go ahead and update it by clicking on Update Now. Once you choose that, the plugin will update and you won’t have to do anything else unless it tells you.
Back to finding and installing plugins. To find and install a new plugin, you’ll go to the plugins page and at the top you’ll see Add New, press that:
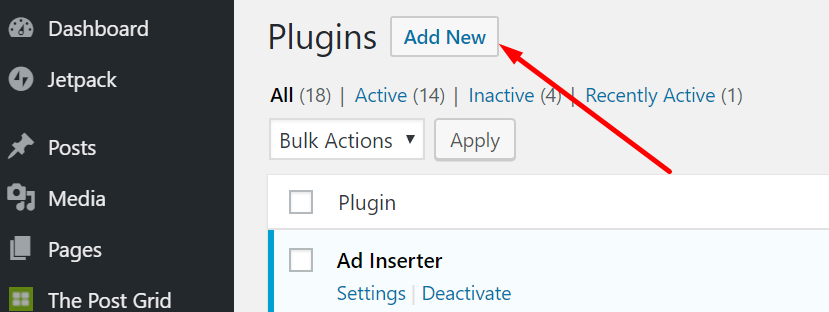
It will open up a list of plugins and you’ll see a search box in the top right corner. At this point you can use it as a search for a particular type of plugin, or search for the exact one you want. I have chosen to find a Social Sharing plugin, so that people can share my posts on their favorite social sites:

(if you like my posts, now would be a great time for you to share this post 🙂 ) You’ll see my social sharebar at the top or bottom of this post:

Once you have searched for a plugin you can then scroll through them all and decide which one you want to use. You’ll be able to choose more details, see when it was last updated, see the ratings of other users read a short description, and install, if you like.
If you choose more details, you’ll see more info that the creator has provided for you, including often, screenshots so you can get an idea of how it actually looks in action.
Once you’re ready you can choose to install your chosen plugin, and it will do it for you. You’ll then go back to your Installed Plugins page and find the plugin and click Activate, when you’re ready for it to start working.
Suppose you searched through those free plugins and didn’t find what you were looking for, then you can go to our old friend Google and search for what you want.
Of course there will be a ton to choose from, free and … not so much, lol. Once you find one you like, you’ll need to download it to your computer from the plugin’s webpage where you found it. Then go back to your Installed Plugins page in your dashboard and choose Upload to upload the plugin you downloaded to your computer up to your blog:

From here it’s just like any other upload, you can choose Browse to find where you downloaded the plugin on your computer and then choose the file. Once you have done that choose Install Now and WordPress will do the rest.
Be sure to go back to the plugins page once it’s been installed and activate it:
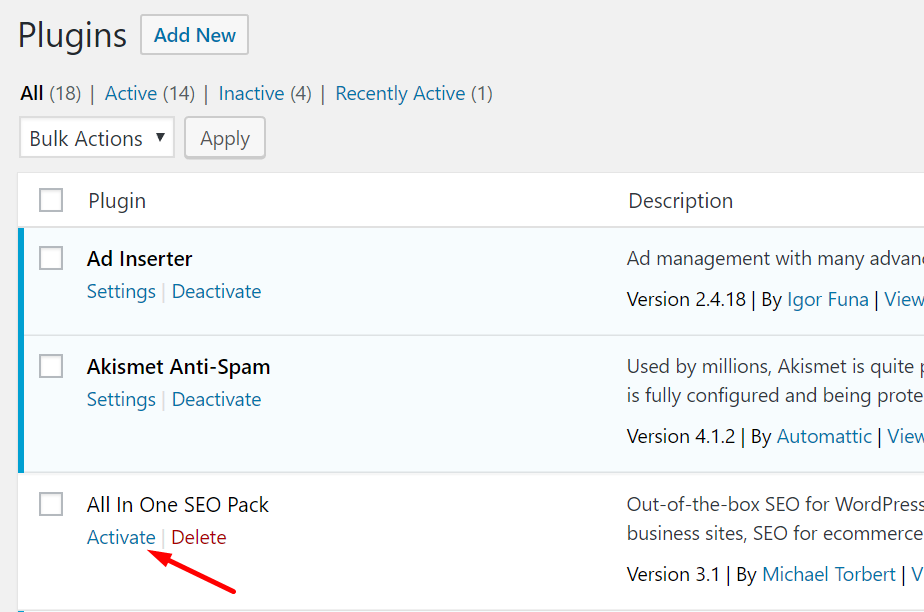
Those are the 2 ways to find and install plugins on your blog. If you have any questions, please feel free to ask!
Below is a video version of this post:

4 comments on “Choosing And Installing Plugins For Your New Blog”